Building and Deploying Agentic Apps: Surprisingly Simple with LangGraph and GCP
April 30, 2026
|
3
minute read
Blog


Most people assume that building an AI agent is a difficult task. Testing, monitoring, debugging and deploying agents can be an issue, since the flow of an agent is non deterministic. However, LangGraph makes the development process super intuitive and fast. Plus, thanks to LangSmith, post deployment monitoring and debugging is done much more easily.
This article will provide an introduction to design an agent using LangGraph and deploy it on GCP. This article is not a deep dive on the process, but rather intended to give you a feel for dipping your toes in the sea of Agentic development.
To demonstrate agent development using LangGraph, this article builds a small GitHub Repository Scout agent. The users can start a conversation with the agent from slack and the agent will be able to get basic metadata-level information about the repo, like activity levels, languages used, license involved, test coverage of the repository by having to-and-fro communication with the agent because of the cyclic nature of the state chart.

LangGraph (ref) serves as the core framework for this project, LangGraph is a low-level agent orchestration framework and runtime for building, managing, and deploying long-running, stateful agents. Because this use case is non deterministic, as the execution flow depends on the user's input, this is a good fit for an agentic application rather than a traditional software.
Traditional software is deterministic, they behave to external triggers and follow a same pre-defined set of steps, always going from point A to B. An agent utilizes probabilistic models ( LLMs ) to determine actions at runtime. They can perceive their environment, reason about its current state, and act with an intent to achieve the goal, not only reaction. Think of an agent as a dynamic flow chart with loops or a state machine where it can circle back to the same state again (ref) if a task fails or an external action (like an API call) returns an error, or keep a human in the loop of execution.
Following tech stack is used:
LLM: Google Gemini 3.1 pro with Vertex AI API and monitoring
Creating an agent in LangGraph is about designing the problem statement into a StateGraph with nodes, edges and state, see the official documentation for further reading.
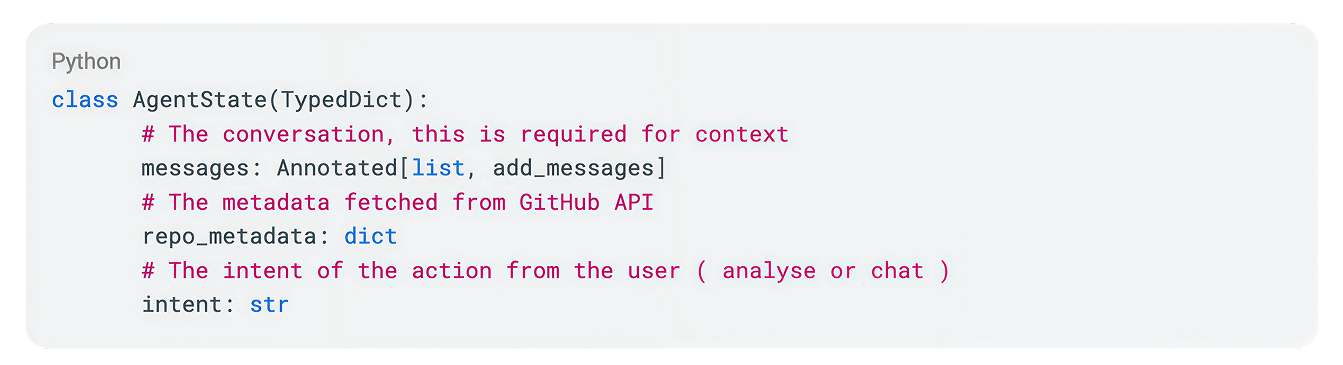
All the graphs have a state, state is just an object which flows through each node, following the control flow across the graph. The state is used in passing context throughout the graph. This is how the state object looks like:
Consider StateGraph as a state machine with Nodes and Edges. We need to create a state graph, add nodes and edges and compile it.
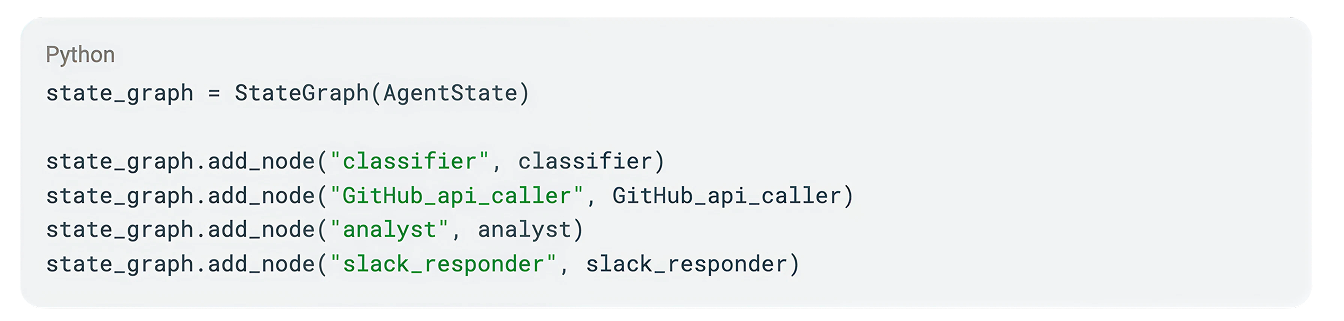
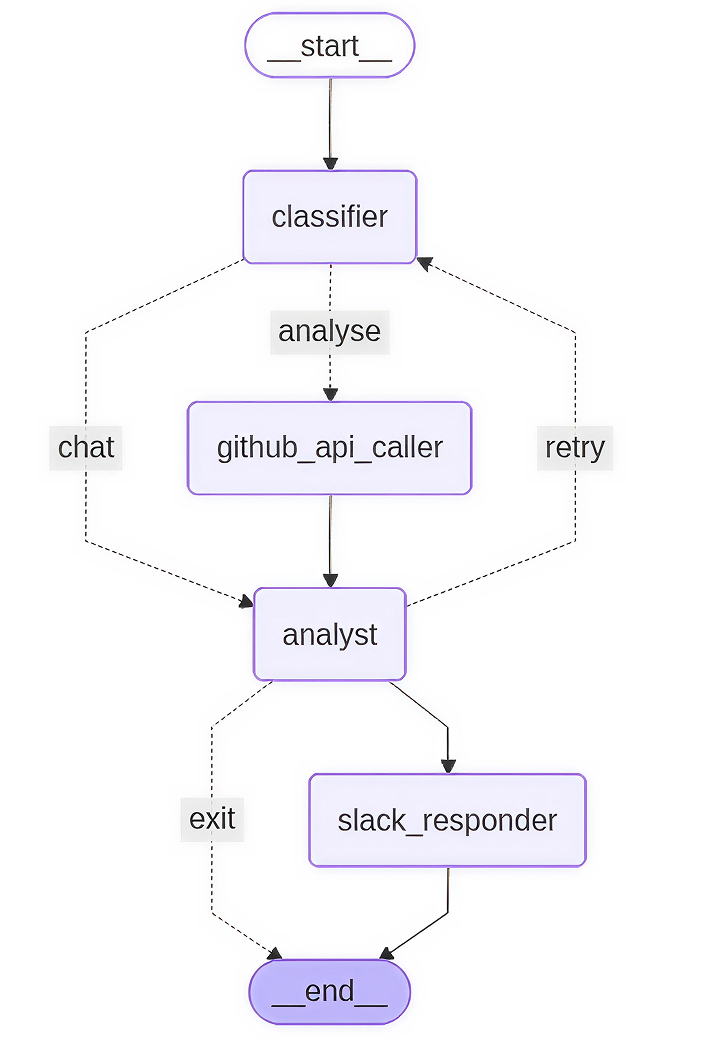
Nodes are nothing but a function, they take some Action and update state. Nodes for this simple agent will be a classifier, a GitHub API Caller, An Analyst and a slack responder.
Following is the minimal code for the nodes. Note that each node is essentially a function, which takes state as input and returns updated state as output. See complete code on the GitHub repository.

Edges are the linkage between nodes. In this use-case, there are three edges representing three paths. The classifier acts as an orchestrator and decides which path to take. The primary paths are straightforward, however there is a conditional edge which manages error recovery. If the Analyst encounters incomplete data or a 404 error, it triggers a fallback loop to the Classifier to solicit corrected information from the user.
The conditional edge in this graph is the main routing flow, it decides which node to be invoked based on the calculated intent. See the complete code for more information.

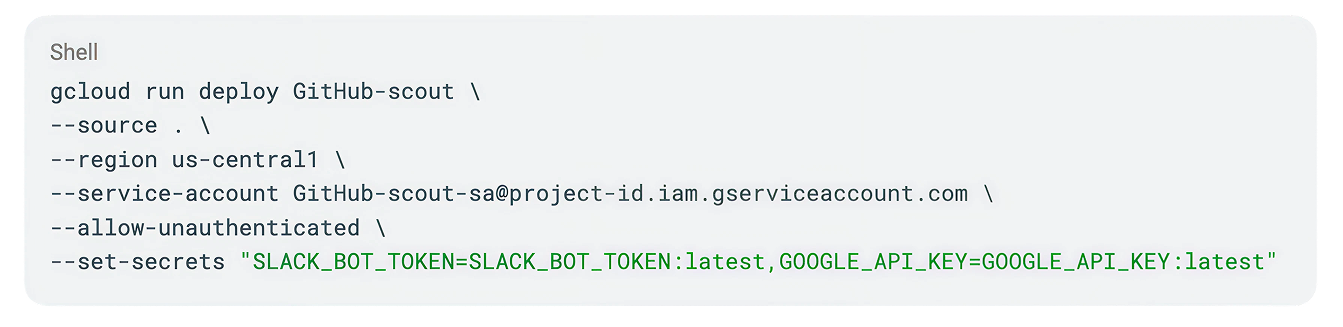
GCP Cloud run (ref) is a fully managed, serverless compute service which can be deployed using cloud build via a single gcloud cli command. Cloud run is ideal for agents because they scale down to zero when not in use, saving money.
Along with cloud run, Vertex AI is used for making LLM calls (ref) and secret manager for keeping the SLACK_BOT_TOKEN and GOOGLE_API_KEY secrets.
To connect slack with the agent, a REST API ( POST “/slack/events” ) is created in the project. A slack app needs to be created and configured with the cloud run URL as the Request URL for Event Subscriptions. Importantly, slack expects an acknowledgment within 3 seconds and because LLM reasoning often takes longer, BackgroundTasks are being used to invoke agents in the background.

To have a real asynchronous conversation, the agent needs to remember the past messages and context. One big advantage of using LangGraph is support for Checkpointer (ref), we can automatically save the agent's state after every step in different persistence layers like Firestore.

Observability and monitoring the agent post deployment is extremely important to proactive failure prevention in the system, agent, GitHub or Vertex AI Apis. LangSmith is a highly recommended solution which monitors the agent's overall state, adds tracing and alerts. Using LangSmith, tracking LLM prompts sent or the raw data coming back from GitHub are done easily. Tracking individual action latency, token usages, quota limits is also possible using LangSmith.
Deepen your expertise by exploring AWS’s agent overview, mastering LangGraph workflow designs, or taking an introductory course. Read more about LangGraph CLI and access the full implementation of this article on GitHub.
--
Fabric Group is a collective of passionate professionals focused on delivering meaningful value for our clients. We combine deep expertise in strategy, design, and software engineering with a distinctive design-thinking approach, underpinned by strong engineering capability, to solve complex business challenges and drive measurable outcomes.
Industry- and technology-agnostic by design, Fabric always works in the best interests of our clients and their goals, selecting the right tools and approaches to create lasting impact. As of 2026, our team of 130 specialists operates across Australia, India, the Philippines, China, and Singapore, bringing a global perspective with local insight to every engagement.
If you're looking for support in accelerating your digital journey, we would love to hear from you.